Decoding the MNIST data set images
I have recently been trying to learn about neural networks by implementing a classifier for the MNIST data set.
One of the challenges that I faced to get started was to decode the data set.
There are decoded versions of the dataset available online, but where’s the fun in that?
A bunch of people have a bunch of different ways of doing this.
Michael Nielsen uses the pickle module from python to do this in his book Neural Networks and Deep Learning.
That’s a pretty easy way to do things, but honestly, I didn’t (and still don’t) know what pickle does exactly, so that method is slightly opaque to me.
I found a blog post from a blog called Monkey Think Monkey Code that outlined a method that read the bytes directly from the uncompressed files, and that made a bit more sense to me.
So I decided to explain it my way, with a few modifications — here we go.
The data is divided up into 4 files, which are listed at the top of the website for the dataset:
- Training set images:
train-images-idx3-ubyte.gz - Training set labels:
train-label-idx1-ubyte.gz - Test set images:
t10k-images-idx3-ubyte.gz - Test set labels:
t10k-labels-idx3-ubyte.gz
The files are available from the website in compressed form (.gz), but these are easily unzipped on UNIX systems using gunzip.
On Windows, the Expand-Archive powershell utility does not support .gz files (big surprise!).
I have git bash installed, so I was still able to use gunzip through that (or, get the expanded versions from my GitHub repo for this project in the “MNISTData” folder).
These files are stored in a simple format directly in the form of the bytes that represent the image data and label data.
They can be “decoded” by simply reading the bytes as a stream of information from the files.
This can be done with any utility that lets you read a file in as a series of bytes.
According to the description of the files on the website, the image files have a few things at the top (or beginning) of the bytestream before reaching the image pixel data.
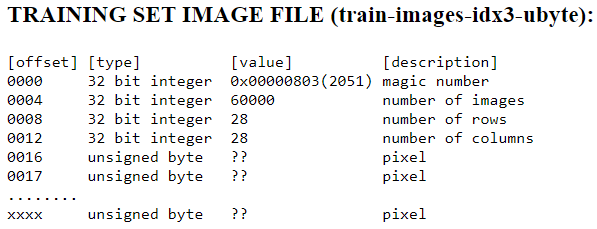
The first 4 bytes are a 32 bit int “magic number”.
I’m not fully sure what a magic number is supposed to do, but it has a significance in computer science.
The following 4 bytes are another 32 bit int which holds the number of images in the file (60,000 in this case).
The next 4 bytes contain the number of rows, followed by another 4 bytes which contain the number of columns.
These signify the size of the images.
In the case of the MNIST data set, the images are \(28 \times 28\) pixels.
So after the first 15 bytes, the 16th byte onwards contains pixel data — 1 pixel value per byte as a grayscale intensity value between 0 and 255.
Here’s how this can be done in python:
1 2 3 4 5 6 7 8 9 10 11 12 13 14 15 16 17 18 19 20 21 22 23 24 25 26 27 28 29 30 31 | |
The images_file variable contains the path to the unzipped file containing the training images (this can be switched out with the test images file to decode the test dataset).
A similar strategy can be followed for the labels, with a slightly different header at the beginning of the bytestream.
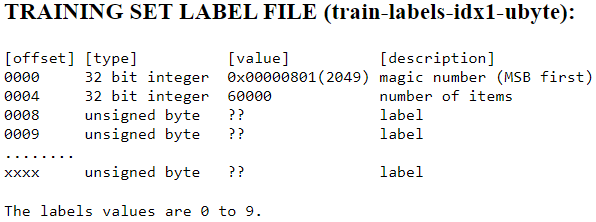
Note that for the label files, we have the first 4 bytes with the 32 bit int “magic number”.
In the next 4 bytes we have another 32 bit int that stores the number of items (in this case labels, 60,000 of them).
Then, from the 8th byte onwards we have 1 label per byte, with label values going from 0 to 9.
This can be read using the following code in python:
1 2 3 4 5 6 7 8 9 10 11 12 13 14 15 16 | |
The above pieces of code can be put inside a function to make things cleaner, but essentially, the images and labels variables will contain the images and labels data respectively.
If you are also practicing on the MNIST Dataset, you might be interested in my attempt.
Feel free to reach out to me using one of the options at the bottom of this page if you have questions.